Lip sync – the movement of the mouth in time to the dialogue – is one of the most time consuming, but important, parts of character animation. When done well, it contributes emotion, resonance and believability to the character. When done poorly, it keeps the audience at arms length; aware that something is wrong, even if they can’t quite put their finger on what that is.
There are a lot of different solutions to achieving lip sync in After Effects, from time remapping to plugins. Today we’re going to have a look at our preferred solution, which keyframes After Effects shape layers to achieve a high level of performance, in a time efficient work flow.
To demonstrate, we’re going to look at one of our recent films ‘The Story of Stars’ for the Royal Observatory Greenwich. The characters in this film were all stars, with limited facial detail and zero body language, meaning we had to get their entire personalities across through just their eyes and mouths.
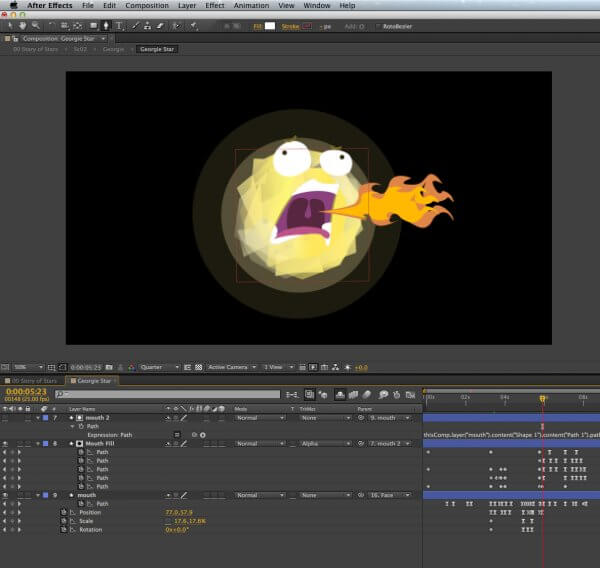
Creating an animatable mouth using Shape Layers
- Using the pen tool, draw the initial shape for the mouth, and name the layer ‘Mouth’
- Above that layer, draw the teeth, gums, tongue, uvula etc as multiple shapes on a single layer. Name this layer ‘Mouth Fill’
- Duplicate the ‘Mouth’ layer, and place it above ‘Mouth Fill’. Name this ‘Mouth 2’
- Open up the Path property, and Alt Click the stop watch
- Use the pickwhip tool to connect the path of ‘Mouth 2’ to the path of ‘Mouth 1’ (OR type thisComp.layer(“mouth”).content(“Shape 1”).content(“Path 1”).path in to the expression panel).
- Parent ‘Mouth 2’ to ‘Mouth’ – these 2 steps will ensure that whatever you do to ‘Mouth’ will be replicated on ‘Mouth 2’, so you can lock ‘Mouth 2’ because you wont need it again.
- Change the TrackMat on ‘Mouth Fill’ to ‘Alpha’ – this means the amount of the inside of the mouth that is visible will be determined by the shape of the ‘Mouth’ layer.
- Animate the shape of the mouth by keyframing ‘Mouth’, and animate the position of the teeth/tongue etc on the layer ‘Mouth Fill’.
So that’s our preferred technique – once it’s set up using the above steps, you can keyframe whatever shapes you need for your performance. There are plenty of images available online to help you understand the basic lipsync phonemes, but it’s important to understand that a mouth might look very different saying a word when a person is happy to when they are sad, and to have that flexibility in your performance. Generally, we prefer a mirror and a lack of self consciousness.
Georgie here (animated by Fern Bailey) had to look bored, burp, get embarrassed, realise she had an uncontrollable need to burp again, burp so hard it spins her in space, notice an invasive telescope, look quizzical, blow a raspberry, look smug, grow old and explode – all in about 20 seconds of screen time. So you can see why we needed to develop a quick, robust lip sync technique!